Verify accounts using micro-deposits
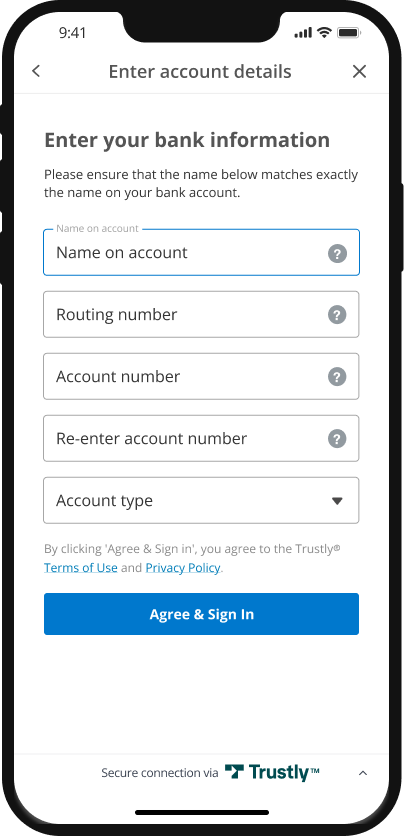
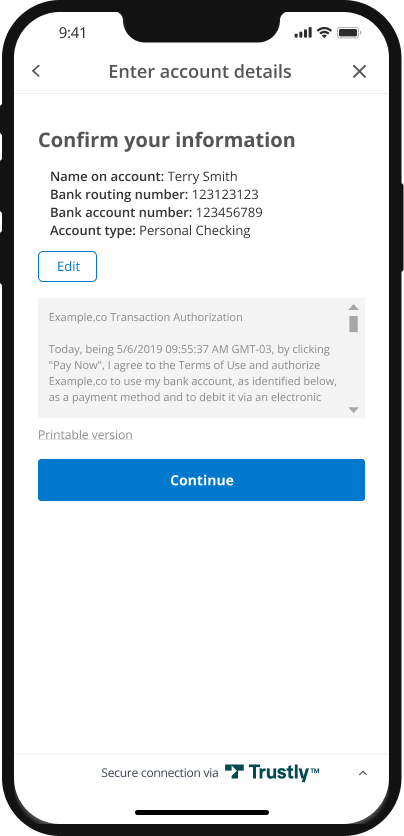
When a customer cannot sign in to their account and authenticate instantly, Micro Challenge Deposits (MCD) act as your fallback. MCDs verify account ownership by confirming the customer can access their bank statement and identify specific deposits.
Trustly automatically handles the logic to choose the best available method:
- Instant MCD (single-session): Uses real-time rails (RTP or FedNow) to send a deposit immediately. The customer stays in the flow and verifies a code within seconds.
- Legacy MCD (multi-session): Uses standard Automated Clearing House (ACH). The customer must leave your site, wait one to three days for the deposit to settle, and return later to verify.
| Feature | Instant MCD | Legacy MCD |
|---|---|---|
| Network | Instant payment rails (RTP or FedNow) | ACH |
| UX Flow | Single-session (Synchronous) | Multi-session (Asynchronous) |
| Latency | < 30 Seconds | 1–3 business days |
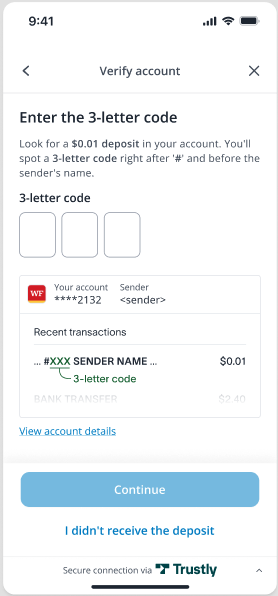
| Verification | User enters a 3-letter code | User enters a 3-letter code |
Automatic Fallback: You do not need to implement logic to choose between these methods. If a bank is not eligible for Instant payments, Trustly automatically defaults to legacy MCD to ensure the account can still be verified.
Prerequisites
- Integrated the Trustly client-side SDK: The verification flow requires rendering the Trustly Lightbox to collect the deposit amounts from the user.
- Implemented a transaction flow: MCD is a fallback method. You must have your primary Trustly Pay (Deferred) or Data (Retrieval) flow set up first.
Create the initial bank authorization
The initial bank authorization does not change. Pass in the same establishData object as was provided during the original authorization.
In the following example, the paymentType is set to 'Retrieval' for Data products. If you are using Trustly Pay, set this to 'Deferred'.
var establishData = {
  accessId: {accessId},
  requestSignature: {requestSignature},
  merchantId: {merchantId},
  description: 'transaction description',
  merchantReference: 'merchant reference',
  paymentType: 'Retrieval', // Use 'Deferred' for Trustly Pay
  returnUrl: "https://yourapp.com/path/return",
  cancelUrl: "https://yourapp.com/path/cancel"
};
See Securing Requests to learn how to calculate the requestSignature
Do not pass Consumer PII (name, email address, etc) in the description field. You can pass Consumer PII in the customer object.


Retrieving the test verification code
You can use our Sandbox Merchant Portal to view the test account verification deposit code that was generated for the Bank Authorization.
- After signing into the Sandbox Merchant Portal, find the Bank Authorization transaction you created earlier.

-
Click the Transaction ID to bring up the details. Scroll down to the Account Verification Deposits section and then copy the Reference Code value.
For Instant MCD, this value is a three letter code that a customer finds in the penny-drop deposit description. For legacy MCD, this value is a three letter code that a customer finds in the ACH deposit description.

Initiate the verification flow
The following examples use the JavaScript SDK. For guidance on building for mobile apps see Mobile Apps .
- To load the SDK on the page, use the following JavaScript tag (replacing
{accessId}with the Access Id provided to you by Trustly):
<script src="https://sandbox.trustly.com/start/scripts/trustly.js?accessId={accessId}"> </script>- To provide optional Trustly configuration options, create a
TrustlyOptionsobject:
var TrustlyOptions = {
  closeButton: false,
  dragAndDrop: false,
  widgetContainerId: "widget-container-id" //Page element container for the widget
};
For details on the Trustly configuration options, refer to the SDK Specification.
- To provide the transaction details to the SDK, create an
establishDataobject:
var establishData = {
  accessId: {accessId},
  requestSignature: {requestSignature},
  merchantId: {merchantId},
  transactionId: {transactionId},
  merchantReference: 'merchant reference',
  returnUrl: 'https://merchant.com/trustly/return',
  cancelUrl: 'https://merchant.com/trustly/cancel'
};
Ensure you're securing your call by including the requestSignature parameter.
- Finally, call the Trustly SDK's
establishfunction:
Trustly.establish(establishData, TrustlyOptions);The following is a full HTML page using the above example.
You'll want to replace accessId and merchantId with the values provided to you by Trustly
<html>
  <head>
    <meta name="viewport" content="width=device-width, initial-scale=1" />
    <script>
      var TrustlyOptions = {
        closeButton: false,
        dragAndDrop: true,
        widgetContainerId: 'widget',
      };
    </script>
    <script src="https://sandbox.trustly.com/start/scripts/trustly.js?accessId={accessId}"></script>
  </head>
  <body style="margin: 0;">
    <div id="widget"></div>
  </body>
   <script>
    var establishData = {
      accessId: {accessId},
      requestSignature: {requestSignature},
      merchantId: {merchantId},
      transactionId: {transactionId},
      merchantReference: 'merchant reference',
      returnUrl: 'https://merchant.com/trustly/return',
      cancelUrl: 'https://merchant.com/trustly/cancel'
    };
    Trustly.establish(establishData, TrustlyOptions);
  </script>
</html>
Enter the test verification code
Using the verification HTML you created, launch the Trustly Lightbox.

After entering the code retrieved from the Sandbox Merchant Portal and clicking Continue, the customer is directed back to your site.
Handle the redirect
Once you get a successful redirect to your returnUrl, you must check the payment.account.verified status to determine if the customer has been verified instantly or requires further action.
Instant MCD
If the customer's bank supports Instant Payment rails (RTP or FedNow), Trustly attempts a penny drop ($0.01) verification. The user locates a 3-letter code in their banking app and enters it on the Trustly-hosted page before being redirected to you.
Check for the following values:
payment.paymentProvider.typeis2(Manual Entry)statusis2(Authorized)payment.account.verifiedistrue
If payment.account.verified is true, the account is verified. You can proceed immediately; the user has already successfully entered their 3-letter code.
Legacy MCD
If the bank is not eligible for instant payments, or if the customer did not successfully complete verification, the transaction defaults to legacy MCD. The customer must wait one to three business days for the deposit to settle and return later.
Check for the following values:
payment.paymentProvider.typeis2(Manual Entry)statusis2(Authorized)payment.account.verifiedisfalse
Because payment.account.verified is false, you must message the customer to return to your site when they are ready to verify their account with the Establish Data object.
Verification Pending: Check your bank statement for a deposit.
- Instant MCD (RTP or FedNow): Look for a $0.01 deposit containing a 3-letter code. This typically appears in seconds.
- Legacy MCD (ACH): Look for a $0.01 deposit containing a 3-letter code. This typically takes 1-3 business days.
Handle the Webhook
Trustly sends a webhook notification to your system for every transaction status change. For Instant MCD, you can use this webhook to confirm verification on your backend, which is more reliable than the browser redirect.
The logic for the webhook payload mirrors the redirect logic. Check the payload for:
payment.paymentProvider.typeis2(Manual Entry)statusis2(Authorized)payment.account.verifiedistrue
If these conditions are met, the account is verified. You can safely update the customer's status in your database to Active or Verified.
Testing
Trustly offers a Demo Bank in the Sandbox environment that can be used to trigger a number of testing scenarios. Read more in Testing.
Error Handling
Trustly uses conventional HTTP response codes to indicate success or failure of an API request.
| HTTP Status Code | Description |
|---|---|
| 200 OK | Everything worked as expected. |
| 400 Bad Request | Often due to a missing, required parameter. |
| 401 Unauthorized | Invalid accessId or accessKey. |
| 500 Server error | An error occurred within the Trustly environment. |
| 503 Service Unavailable | The server is currently unable to handle the request due to a temporary overloading or server maintenance. |
Not all errors map cleanly onto HTTP response codes, however. In addition to the HTTP response code, Trustly returns an array of error objects that describes the errors as a JSON string such as the example below.
{
  "errors": [
    {
      "domain" : "com.trustly.merchantgateway.v1.exception.InvalidParameterException",
      "code" : 200,
      "message" : "Could not find a transaction using Id 10000021"
    }
  ]
}| Error Code | Description |
|---|---|
| 100 | Internal error. An internal error (an internal database exception for example) occurred when trying to process the request. |
| 150 | Remote error. A remote error (the consumer's bank interface is down) occurred when trying to process the request. This is an internal error. |
| 200 | Invalid parameter error. One of the request parameters is invalid (sending an invalid amount format string for example). |
| 300 | Security error. These are generic security errors that can happen when trying to process the request. |
| 326 | Expired split token. |
| 330 | Invalid account. |
| 331 | Not enough balance. |
| 375 | Access control error. This occurs when some security parameter (accessId, accessKey or requestSignature) is invalid and the request cannot be processed. |
| 390 | Fraud analysis. Suspicious transaction or negative data. |
Updated 18 days ago